
02_grayscale.md 5.1 KB
Tutorial 02 - Grayscale Image Operations
After reading your image from a file into memory, you may want to optimize its histogram using gray value transforms. This tutorial will tech you the basics.
Pattern for gray value transforms
You can use the following pattern for your gray value transforms.
template <class P> void MyTransform(NICE::ImageT<P>& image)
{
	for(int x = 0; x < image.width(); x++) {
		for(int y=0; y < image.height(); y++) {
			P pixel = image.getPixelQuick(x, y);
			// Insert transform here
			image.setPixelQuick(x, y, pixel);
		}
	}
}
Note that the get/setPixelQuick Methods don't perform boundary checks!
Optimization
If you have access to Intel IPP, you can use the overloaded operators provided in ImageOperators.h.
Another easy way to improve performance is adding a "parallel for" OpenMP compilation hint.
Gamma transforms
Gamma transforms are a little more complicated, because gray values are not always in the [0,1] range. For example, the Image and GrayImage16s use the full positive range of their data types while the FloatImage class can handle arbitrary ranges.
You can use the max() and min() methods on your image to find its specific range.
Histogram
NICE provides a Histogram class for 8-bit grayscale and color images (Image and ColorImage). To calculate an image's histogram, use the constructor:
NICE::Histogram histogram(image, 0, 256);
Sample code
This sample program attempts to equalize an image's histogram by deriving a gray value transform from the cumulative histogram.
Take this  :
the
:
the 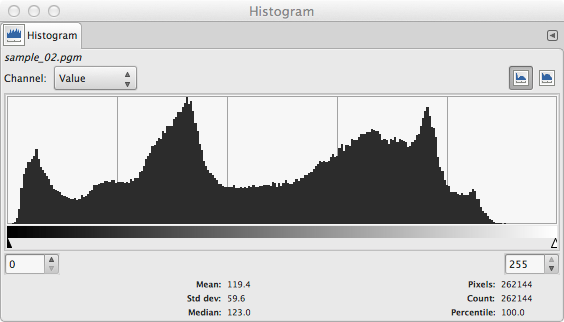 shows that it doesn't make
use of the whole range of gray values.
After running the sample program, the image should look like
shows that it doesn't make
use of the whole range of gray values.
After running the sample program, the image should look like
 .
We can see in its
.
We can see in its  that is uses
the complete range now.
that is uses
the complete range now.
Includes and file names
Just like the previous sample, the program needs input and output file names. It also uses the ImageT and ImageFile classes, but needs the relevant headers for Histogram and VectorT as well.
#include <iostream>
#include <string>
#include <core/image/ImageT.h>
#include <core/image/ImageFile.h>
#include <core/image/Histogram.h>
#include <core/vector/VectorT.h>
The command line is then checked and stored like in the first sample. Most sample programs will use this pattern.
// Check if enough parameters were supplied
if (argc < 3) {
	std::cout << "USAGE: " << argv[0] << " <input image> <output image>\n";
	return -1;
}

// These are our file names
std::string input_path(argv[1]);
std::string output_path(argv[2]);
Calculating the histogram
We read the image file specified as a command line argument using ImageFile like we learned in the first tutorial. This time we don't use ColorImage, because the sample program describes a gray value transform.
When constructing a Histogram, we need to specify the range of gray values in our image. 8-bit images have values ranging from 0 to 255, but while the histogram includes the lower boundary as a bin, it does not include the upper boundary because it uses the difference between the boundarys to calculate the number of bins. This is why the sample program uses the values 0 and 256.
The cumulative functions doesn't return another Histogram, but an IntVector.
// Read image into memory
NICE::ImageFile source_file(input_path);
NICE::Image image;
source_file.reader(&image);

// Calculate cumulative histogram
NICE::Histogram histogram(image, 0, 256);
NICE::IntVector* cumulative_histogram = histogram.cumulative();
The transform
In theory, if we use the cumulative histogram as a mapping for our gray value transform, the resulting image has a perfectly uniform histogram. We can prove this for images that are continuously differentiable functions of real numbers. This is not the case for digital images: suppose an image is filled with a single color. There is no gray value transform that can turn this image into one with a uniform distribution of gray values.
We also need to scale the cumulative histogram down to our 8-bit range. The largest value will match the total number of pixels in the source image, so we use that to calculate a scaling factor.
double factor = 255.0/(double)(image.width()*image.height());

// Transform using our pattern
for(int x = 0; x < image.width(); x++) {
	for(int y=0; y < image.height(); y++) {
		// This is the old gray value
		Ipp8u pixel = image.getPixelQuick(x, y);

		// We use it as and index into the cumulative histogram to
		// computer the new one. This has to be scaled appropriately
		// using our precomputed factor.
		double new_pixel_f =
				((double)cumulative_histogram->get(pixel))*factor;

		// The pixel format is 8-bit integer, so we have to convert
		// the result
		Ipp8u new_pixel = static_cast<Ipp8u>(new_pixel_f + 0.5);

		// ..and save it
		image.setPixelQuick(x, y, new_pixel);

	}
}
We can now write the changed image back to disk. We use a new file to preserve the original.
NICE::ImageFile dest_image(output_path);
dest_image.writer(&image);
return 0;